
I have always written blog posts about subject matters that are second nature to me (I’ve been doing graphic design for 25+ years and photography for 10). Today, I’m throwing that out the window and telling you about something I’ve been doing for a whopping 2 months, on purpose; one month before that was not on purpose. It’s new to me! How to become a local guide in Google Maps! Have you tried this yet?!? It’s pretty cool!
This post covers how to become a Local Guide in Google maps, how to upload photos and track views and some of my personal observations.
The general concept is that you visit different places (you probably already do this!) and you upload photos you’ve shot; you write reviews, and give star ratings, correct incorrect info and document new places — and you get points toward Local Guide Levels (shown below).
If you want to up your iPhone editing game,
check out my step-by-step PDF of how I edit my photos …
5 reasons to become a Google Local Guide
- If you’re a local business person looking for an easy way to get social proof, this is it! You can gain levels based on your actions, rather than waiting on approval or recognition from others. Yay for radical self-reliance!
- It adds a gamification aspect to visiting the places you’re going anyway – like Pokémon Go, but IRL!
- It’s a great way to share your unique photographic eye with the world
- It gives you a good reason to go places and document them for others
- It’s fun to share what you know and what you’ve seen; you get the local guide badge on your profile pic on your reviews!
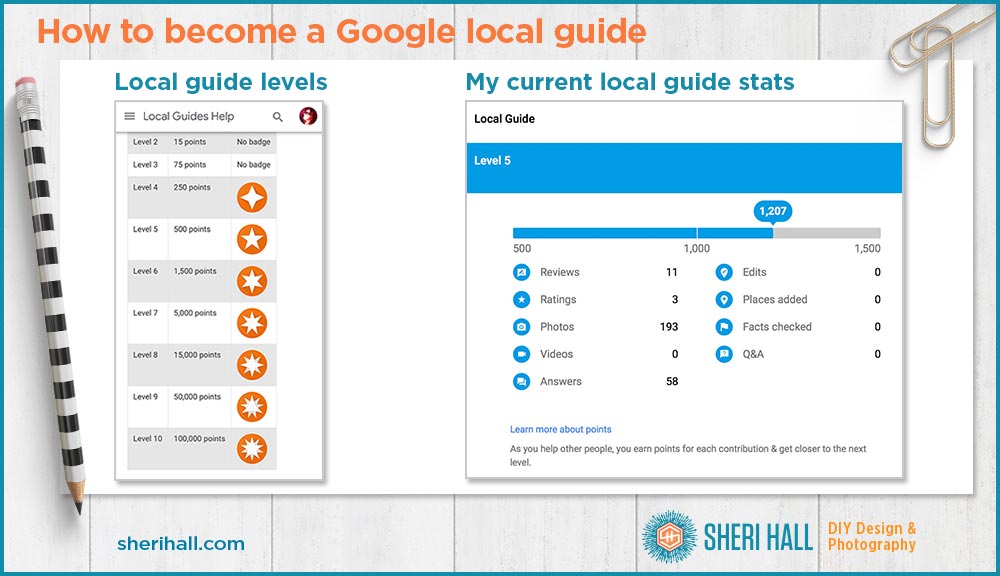
How to become a local guide: Badge levels and where I am
I started doing this accidentally in late June, then started paying attention and adding photos and reviews in July. It’s now late August and here’s where I am (see graphic above).
Milestones for Local Guides
- Local Guide Level 1 – 0 points, no badge
- Local Guide Level 2 – 15 points, no badge
- Local Guide Level 3 – 75 points, no badge
- Local Guide Level 4 – 250 points, 4 pointed star badge
- Local Guide Level 5 – 500 points, 5 pointed star (I am at 1,207 points, almost to level 6!)
- Local Guide Level 6 – 1,500 points, 6-pointed star
- Local Guide Level 7 – 5,000 points, 7-pointed star
- Local Guide Level 8 – 15,000 points, 8 pointed star
- Local Guide Level 9 – 50,000 points, 9-pointed star
- Local Guide Level 10 – 100,000 points, 10-pointed star
How much is each item worth?
- Review – 10 points ea.
- Review with more than 200 characters – 10 bonus points (on top of the 10 points for the review)
- Star rating – 1 point ea.
- Photo – 5 points ea.
- Video – 7 points ea.
- Answer – 1 point ea.
- Respond to Q&As – 3 points ea.
- Edit – 5 points ea.
- Place added – 15 points ea.
- Fact checked – 1 point ea.
![]()
How to become a local guide: Additional Local Guide Badges
Under the Local Guide umbrella, these are specific badges you can achieve!
If you like to take photos of places you go, you might want to go for the different levels of Photographer badges (“award for bringing places to life with amazing photos of places people care about,” per Google).
If you like to review places, go for the different Reviewer Badges (“award for helping others by writing detailed reviews of places people want to know about,” per Google). I will cover this in my next post!
If you’re a Trailblazer, go for that badge (“award for being the first person to add important info about places”).
For the Fact Checker badge, you need to answer questions about places, and suggest edits (“award for helping others get the right info about places on Google”).
How to become a local guide: Photographer badges
This post covers photographer badges; I’ll cover the rest in a later post
Photographer Badge Levels
Novice Photographer
- Add photos of 3 places (you can do this in a couple days and start working on your expert badge)
Expert Photographer
- Add 100 photos (I am at 193)
- Add photos of 25 places (I am at 39)
- Get over 100,000 photo views (I am at 76,557)
Master Photographer
- Add 1,000 photos (I think I can do this by early-mid 2019)
- Add photos of 100 places (I think I can do this by late 2018)
- Get over 1,000,000 photo views (I think this will take a year, so late 2019)
How to become a local guide photographer: Add photos, be selective, check your photo view stats
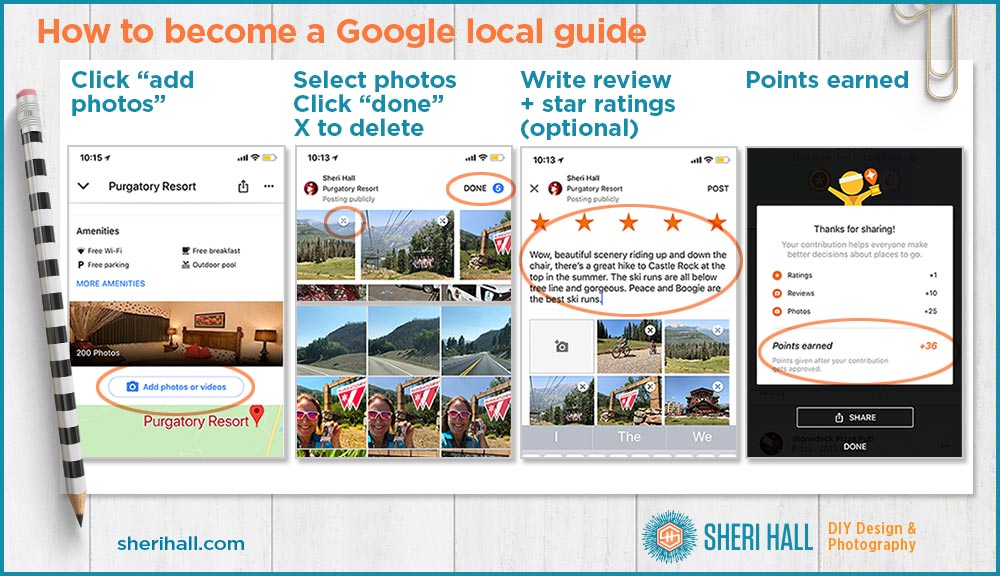
- To add photos, go to the location in your Google Maps (make sure the red pin is for the place you want).
- Scroll down below the photos and click the blue “Add Photos or Videos” button. You don’t edit photos upon upload, so make sure you edit them elsewhere before doing this step. Google knows where you’ve shot your recent photos so it shows you the recent photos shot in that location.
- If those include the ones you want to upload, start clicking on them and they will show up at the top.
- Click Post when you’re done. Choose 1-5 different views of this place and upload them.
- If you select some and decide you don’t want to upload them, click the X at the top and they will be removed from your selections.
- If you upload a photo and decide later that you don’t want it included in Google Maps you can delete it after the fact, even if it has views.
Google Maps may ask if you want to rate (stars) or review (write sentences) about the place. If you do, go ahead and do it. You will also have a chance to add photos in a written review. DO NOT add the same or similar photos as the ones you uploaded straight in the Maps app that is not in the reviews section — don’t duplicate photo uploads. It may throttle your progress of getting views on your photos which slows down your progress to make it to the next level. We’ll talk more about reviews in a later post.
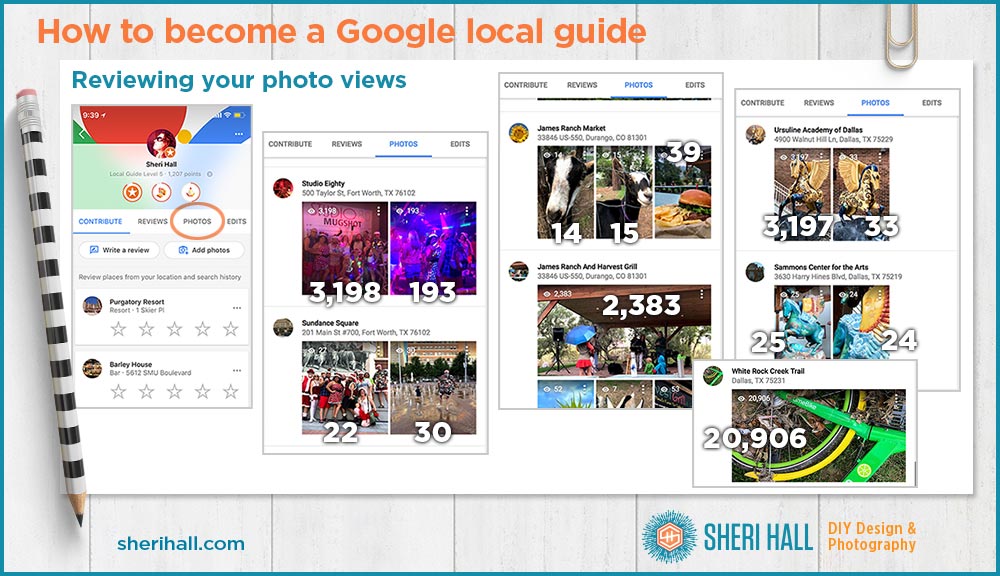
How to become a local guide: Check your progress
Every morning I launch Google Maps on my phone, go to the top left corner, down to Your Contributions and click on it. Then I click on photos on the main menu and see what my view count is.
I have about 75,000 views as of this writing. I need 100,000 to reach Expert Photographer status and I expect to do this in the next 2-3 weeks! I have uploaded 193 photos so far. It’s fun to scroll through the photos and see the view counts of each.
I wish I could give you some rhyme or reason for what gets more views. I can’t! I have uploaded 2 sides of one statue in one location (no other photos uploaded); one of them has 3,197 and the other has 33. (See the photos at top right of graphic below.) Why? I have no idea. I would would guess the views are a function of how long a photo has been there and how popular it is. The longer it’s there AND the more popular it is, the more views it gets, as in it seems to snowball. Snowballs are good!
How to become a local guide: Observations
Another odd observation I have is that I have not seen more than about 200 photos posted for any single location. I am fairly certain there have been more than 200 photos posted for the Dallas Arboretum, so Google must clean out the older, less popular shots as time goes on.
The more photos I upload to one place, the fewer the views are for each photo. This is a bit of good news because it means you don’t need to upload many photos for your view count to increase quickly. I think this is also a function of how many other people have uploaded a photo of the same place.
If I upload 15 photos of the Dallas Arboretum, the views creep slowly upward, but if I upload 15 photos of a Mexican resaurant (cocktails, food, interior art, exterior mural, patio, bar, etc.) some of them do really well and some creep along in views. I assume there are fewer photos for a restaurant than the Arboretum, thus less competition.
If I upload several photos of one place into photos (like more than five) and some similar photos in the review section, progress gets throttled. Although my views of individual photos increased daily, my total views did not increase for a couple weeks. Obviously the math doesn’t work for this, so I assume it’s a throttle or a math bug.
Google only lets you choose one geographic area to call your home city. I have two (Dallas and Durango), but Dallas is the one I entered into maps. I upload photos of both places and I don’t know what effect this has on anything.
My single highest viewed photo has 20,906 views and is the second photo I uploaded (so it’s been there a while — since June!). I don’t know why. It’s a shot of a Lime bike pulled out of White Rock Creek and lying next to the trail. At the time, there was a lot of press about Dallas’ rental bike numbers leveling off and some companies leaving the Dallas rental bike market. Maybe that’s why it has so many views? I happen to think it’s a cool pic.
How to become a local guide: Conclusion
How to decide what to upload: start by uploading 1 awesome photo of a place; it won’t gain you many points for your local guide badge progress, but the views will help you progress toward your next photographer badge. After you do this for a few locations, try 2-3 photos and see how your view counts increase.
Choose locations that you don’t think have many photos, or that probably have a bunch of similar photos and yours is different.
Google seems to like slow and steady progress, so don’t try to game the system. But do experiment and see if you can figure out patterns for number of uploads of one location vs. number of photo views for that location.
How to become a local guide: Google resources
https://www.localguidesconnect.com
Local Guides How-tos
https://www.localguidesconnect.com/t5/General-Discussion/bd-p/localguide/label-name/How-tos
How to become a local guide: Your turn!
Are you a Google local guide? If so, how long have you been doing it and what is your level? How often do you upload photos? Do you have any insight on what does well and what doesn’t? Let me know in the comments below. I would love some real-world observations.
Go upload some photos!
Here’s what I want to know, Sheri. I am at level 7 with 5,262 points. What are the benefits? What are they doing with the points? If there is a way to cash in somewhere, or trade in for something other than my own gratification, please let me know.