There’s a nifty little command hiding in the middle of the type menu in Illustrator. It’s a serious goldmine of usefulness, you guys! It’s been part of Illustrator as far back as I can remember and I’ve been using Illustrator for 28 years (yikes, yes, I am an old-school AI girl).
When working in Illustrator
- We want to work efficiently as in we want to work with the shape of an A, not a text block consisting of an A
- We want to work precisely, being able to see the shapes we are trying to edit (you can’t do that if it’s still type)
- We want to easily customize shapes for logo design purposes, so that our logo work is unique in all the world
- We want to create shapes from dingbat fonts and edit paths as outlined shapes
If you’ve never used this, you really gotta try it! It will make your logo design diva life much easier, I promise.
Drumroll please … it’s Create Outlines

Create outlines in Illustrator: What it does
Create Outlines takes the text that you’ve typed in, looks at the font files (OTF or TT hiding somewhere in your system) that tell the computer how to display this particular font and pulls out the shape info for your letters and changes the text into shapes.
The downside is that you can’t edit it as text anymore. (That’s why I make a copy of my text BEFORE I create outlines.
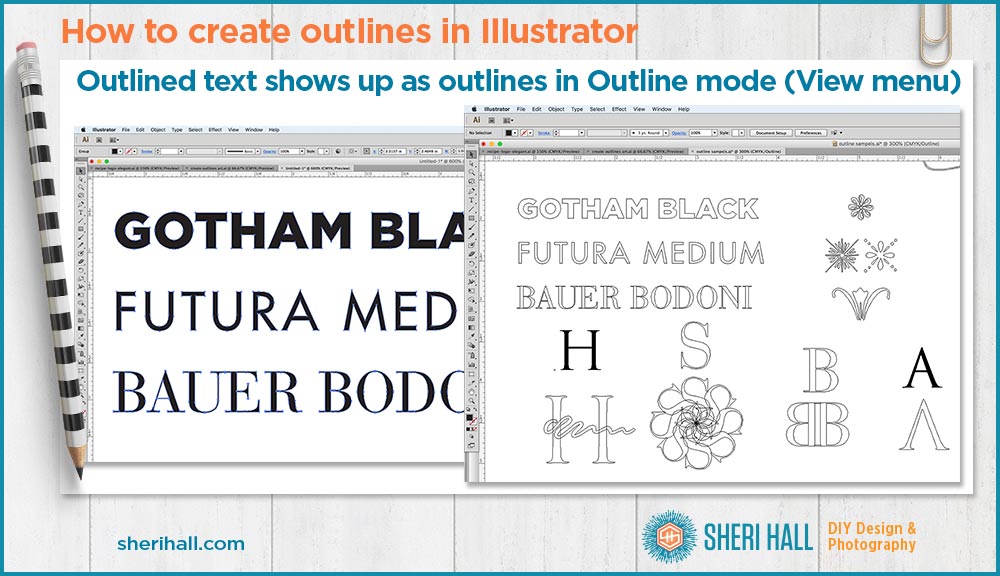
The upside — and it’s way up there — is that you can manipulate the shapes like you can any shape in Illustrator. You can add anchor points, delete segments, redraw segments and drag anchor points to shrink or stretch parts of the letter. (See examples below)
Bonus: You also get a look at how well the font was made. Generally, the fewer anchor points used to create each shape, the better the quality and smoother the curves and shapes. More anchor points means a larger file size which takes longer to print, makes larger PDFs etc.
Got fonts? If you want to try this technique in the real world, you gotta have a killer font library! If you want suggestions on where to find fonts, download my free guide for free + paid + deals + bargain font resources:

Create outlines in Illustrator: How to use it
1. Select the Text tool (T) and type your text or dingbat characters.* The size doesn’t matter but the font does. You’ll be able to change the size after you do this, as you can with any shape, but you can’t change the font.
Important note: you can’t easily undo this after you start editing the shapes that you create so I find it safest to duplicate my text block FIRST (while it’s still text), then create outlines from the copy. This ensures my original is still text as far as the computer is concerned so if I need to edit or change the font, I can, without pulling my hair out.
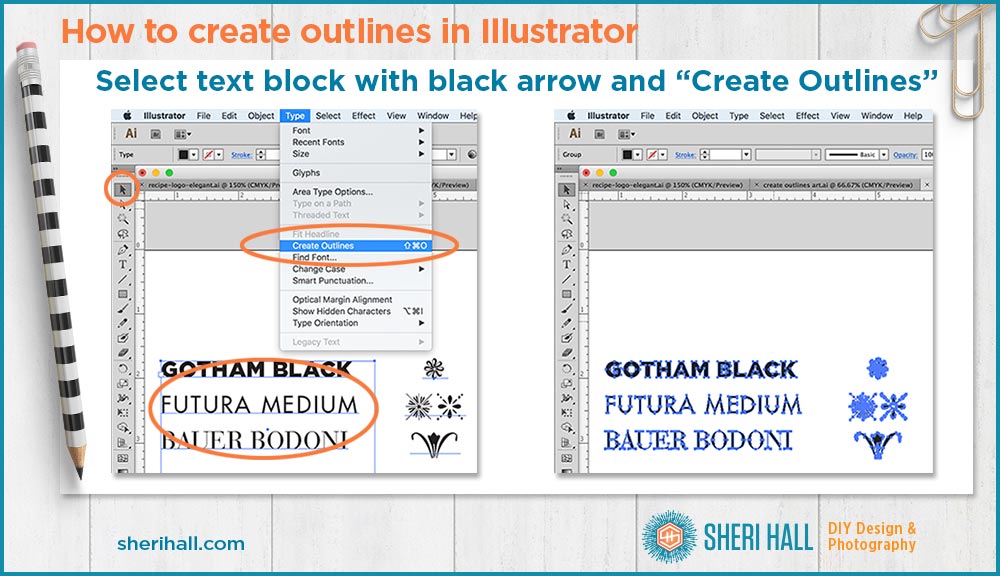
2. Go to the toolbox and choose the black arrow (selection tool) at the top, click on the text block you just created
3. Go to the Type menu at the top, go down about half-way and choose Create Outlines
4. Boom! No more text, at least the computer no longer views this as a block of text, though it still looks like letters to a human eye.
*Dingbat fonts! They are so versatile for printers ornaments, icons, mini illustrations, and more. If you haven’t looked into the wonderful world of dingbat fonts lately, dive in here (my own post with tons of examples).

This is the fun, creative part …
Create outlines in Illustrator: Why would you want to do this?
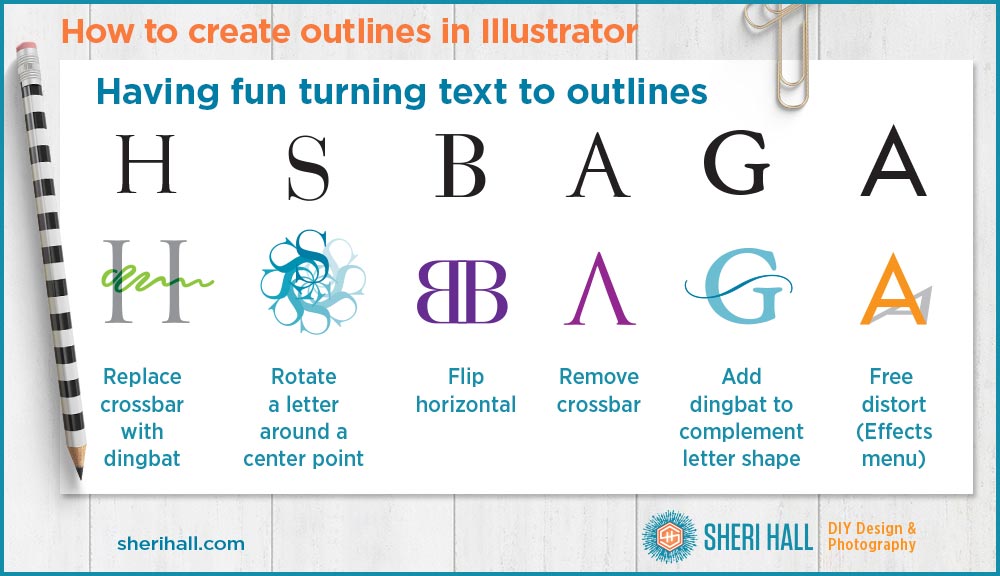
This command is so useful! Let me throw a few examples at you. After you start using it, you’ll better understand and appreciate its power. I’ve shown a few examples above of the original character and the edited version I created after I turned the text to outlines.
- Move letters or dingbat shapes around separately so you can control them independently — rotate, flip, slant, distort etc. This is hugely useful if you’re designing a logo. (If your desired letter is in a block of text, be sure to go to the Object menu > Ungroup to release the shapes from each other. Then you can pull out just the letter you want to play with.)
- To edit letter shapes: remove the crossbar on the the A, replace the crossbar on the H for a logo, extend ascenders and descenders. Again, this is hugely useful if you’re designing a logo.
- To edit dingbat shapes
- To edit out complicated shapes in letters, particularly speckles in vintage-looking fonts, thereby simplifying the art for a smaller file size and quicker printing. Obviously you don’t want to remove all of the rustic character in the vintage fonts, but sometimes, they are just too complex.
- Make characters thicker – you can do this without outlining the text first, but I find it much more accurate to create outlines of the text first, then stroke it, then outline that, then delete the overlapped shapes and just keep the one larger shape. Again, this is hugely useful if you’re designing a logo.
Create outlines in Illustrator: When do you really need to do this?
If you are creating a logo, a chart, or other vector art that you plan to import into a page layout program like InDesign, it’s highly recommended that you change all text to outlines before you export your .ai, .eps or other vector file.
The benefit is that your file doesn’t need the font files installed on the system that will open and print your artwork. Turning text to outlines keeps your file a self-contained file which makes it easy to pass around to whoever needs it.
Create outlines in InDesign
Yes, InDesign has this ability as well. Set your type as you normally would, then select your type box with the black arrow at the top of the toolbox, go to Type > Create Outlines. Again, you will no longer be able to edit your type, but if you want to do something artsy with it — a headline, perhaps — you might prefer the outlines to the text.
Do you use the Create Outlines command in Illustrator? What do you use it for?Tell me in the comments below …


