In the first part of this 2-part series on shooting cocktail photos I talked about shooting in natural light and how to set yourself up for getting a great photo. In this part I’ll cover the specific shots I like to take, what angles I like, how I deal with backgrounds and how I take the humble cocktail photo to the next level.
It’s no secret that one of my favorite things to shoot is the margarita (the most popular cocktail in the US according a Dallas News article.) I usually order frozen with salt and it often comes with a lime (wheel or wedge). Sometimes, I get a flavored one or a swirl. All of these things can dress up a plain old cocktail and make it photo-worthy. My goal is to make a predictable cocktail photo into a piece of art. I’ve been doing this for about 8 years and I’ve learned a lot. If you want to follow my adventures in margarita shooting, find me on Instagram @sherihall. https://www.instagram.com/sherihall/
Here are my best tips for shooting captivating cocktail photos (part deux):
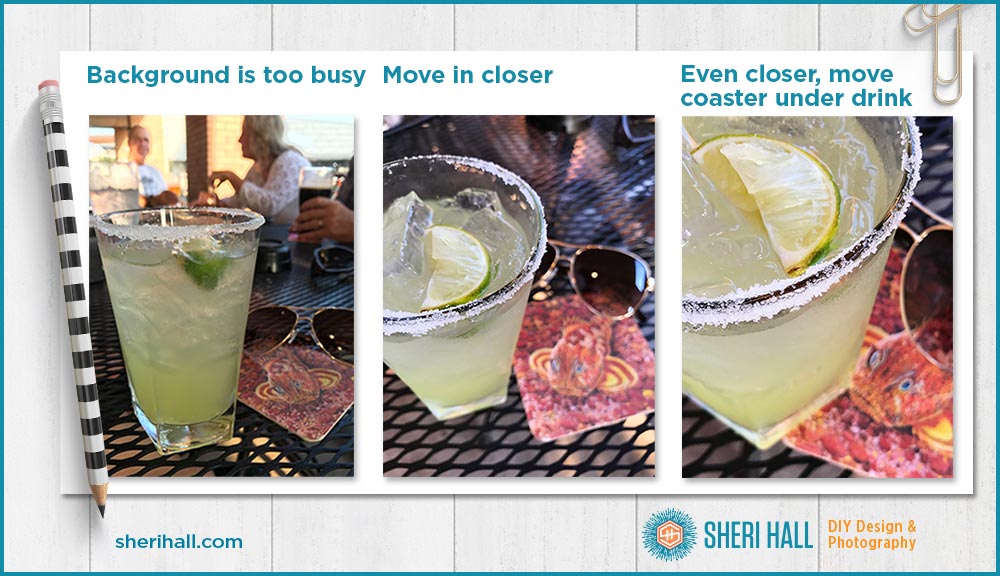
6. Cocktail portrait
For this shot you want to be fairly close, like how you would see the drink in real life if it were sitting in front of you. Don’t shoot from overhead, or down low from the side for this one. The bird’s eye view should include the rim, the garnish, the base of the glass, the straw and a little background.
What else is on the table that might add interest? A bowl of chips, a bowl of salsa or a glass of water in the background can set your drink off nicely if the background is blurry enough to not interfere with the main subject. Too much clutter in the background can be a distraction so consider removing things if it looks better.
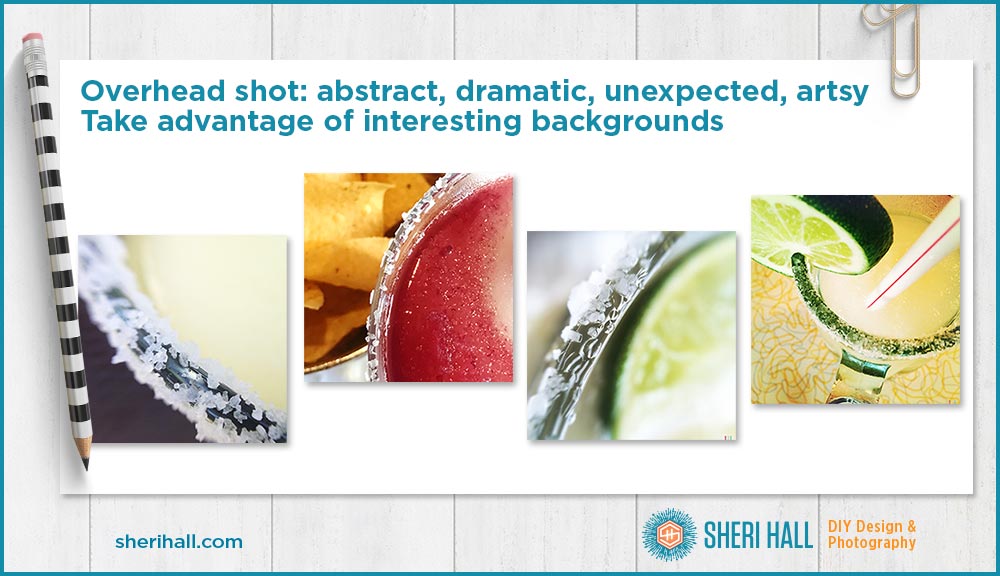
7. Overhead cocktail photo
This is a fun one and can get very abstract. Check the background; is the table itself interesting if you shoot straight down (Mexican tile, a diner table with ’50s pattern)? Is the napkin OK, or does it look better without? Is there a coaster with the restaurant name on it?
If you shoot straight down, you will obviously have a circle or portion of a circle depending on your crop. Try them both.
The margaritas in the following illustration are from unknown, Mi Cocina, Taco Diner and Uncle Julio’s.
8. Bar shot
If you’re sitting at the bar and there’s not too much clutter between you and the bottles behind the bar, explore that shot. If a bar is clean and well-lit, putting your cocktail in the foreground can make a great shot. You can shoot this from the side so you don’t see the whole rim, or from bird’s eye view so you get a natural view looking down, but still have the lights and bottles in the background.
When I try these shots, I also try to have the bartender in the background if he/she’s in the middle of making a drink. This is a tough shot. He’s usually moving too fast to be sharp in the photo, or you get a random arm in the background of your photo. If you have the patience, shoot anyway and be ready to delete the shots that don’t turn out.
I’m not a big fan of these shots taken with camera phones because bars tend to be low light and phones are not as good in low light as full cameras. They’ve gotten a lot better, but it’s still a challenging shot. Also, this shot is more about the bar and less about the cocktail.
The shots in the following illustration are from Havana Cafe – Mojito Bar.

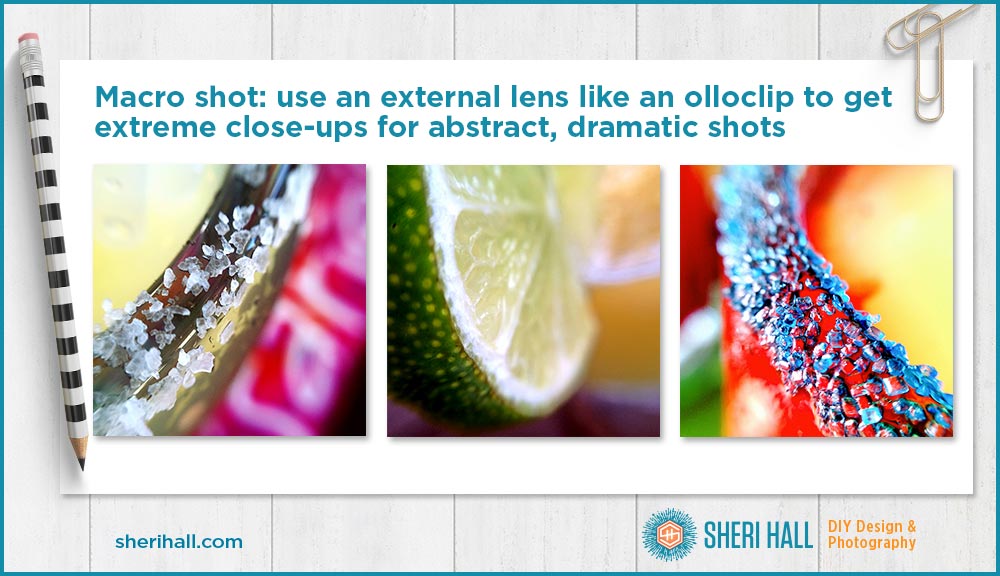
9. Macro cocktail photo
This one is a little unusual and will make your shots more abstract, but it’s oh-so-fun. There are a bunch of different add-on lenses for camera phones; the one I use is the ollocip. It comes with 3 lenses that include macro and fisheye. I use both macros, but rarely the fisheye.
The macro lens is particularly useful if you have a garnish on your drink. Since I shoot mostly margaritas (you’ve probably figured that out by now if you didn’t know already!), I like to aim the olloclip at the salt and the lime and see what happens!
Focus can be tricky and very shallow so shoot several photos and delete the soft ones. Keep the sharp ones.
The cocktails in the following illustration are from Rosario’s Mexican restaurant in San Antonio, TX, Hook Line & Sinker, and Blue Goose Cantina.
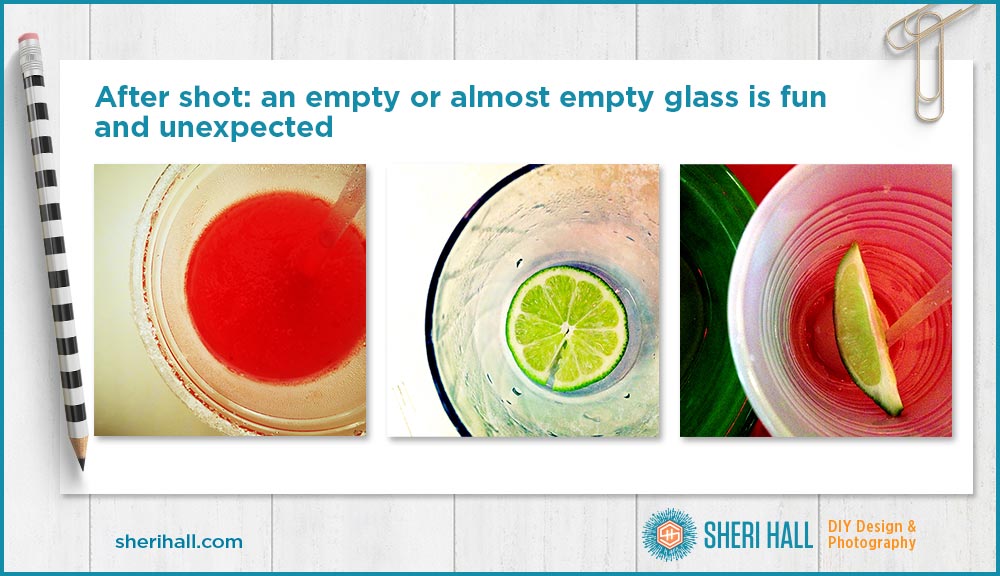
10. After shot cocktail photo
An empty glass with the garnish at the bottom can be a fun, abstract, unexpected shot. For some reason this is the shot I usually forget to take.
The cocktails in the following illustration are from Taco Cabana, homemade and Blue Goose Cantina.
Do you like to shoot cocktails? What is your favorite cocktail to shoot? Do you have any tips and tricks to share?
What’s your favorite margarita or cocktail recipe? Please comment below!