Do you ever wonder what you would look like as a giant … or a little person?
Through the magic of varying your camera angle it’s pretty easy to find out!
When you’re shooting a subject, try adding some drama by changing the angle you’re shooting from. This works best on a person, small to medium statue, flower, cat, cocktail — anything you can think of that you can walk around and shoot from above and below.
How to create drama: Play around with your camera angle!
It’s not as complicated as it sounds. Pretend you’re a scientist and you’re studying a subject from all angles, without touching it.
- You want to look at it straight on, to get an expected, descriptive viewpoint
- You want to look at it from above to see if it gives you any new information or interesting viewpoint
- You want to look at it from down below to see what the underside looks like, and how dramatic it looks with sky behind it
- You want to walk all the way around it to see what the sides and back look like (don’t forget the top view, straight-on view and underside view from the back side too!)
- Get closer
- Get farther away
As a photographer you also want to be aware of the background because that can be distracting or add drama and interest (think cloudy skies with puffy contrasty clouds!)
Now, take your camera with you on this study and shoot that subject from every angle you can possibly think of. At least one of them will come out interesting, unexpected or awesome!
Let’s look at some examples:

Camera angles for people:
- Hold the camera above the subject’s head and shoot down at him/her. Hold the camera over your head and angle it down at the subject. Try to get some sky or background in there so it’s not all ground. Your subject should look small.
- Hold the camera at the subject’s eye level for a realistic straight-on view. Your subject should look normal life-size
- Hold the camera below the subject’s head and shoot up. You either need to squat down a bit or hold the camera down at waist level if you’re standing. Ideally, you’ll get some sky in the background. Your subject should look tall and larger than life.
Preference: I like the shot from above because it’s funny; I look like a tiny skier haha.
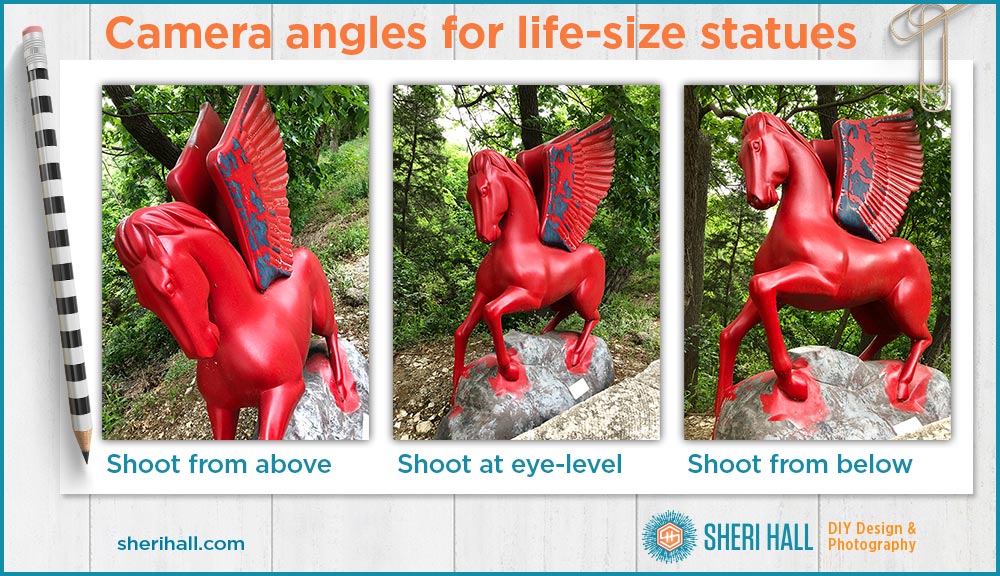
Camera angles for a medium-size statue (about as tall as a person):
- Hold the camera above the statue and shoot down at it (hold the camera above your head and angle it down). Try to get some sky or background in there so it’s not all ground. Your subject should look small. You should see a little bit of the top of the statue.
- Hold the camera at the subject’s level for a realistic straight-on view. Your subject should look normal life-size with a realistic background.
- Hold the camera below the subject’s head and shoot up. You either need to squat down a bit or hold the camera down at waist level if you’re standing. Ideally, you’ll get some sky in the background. Your subject should look tall and impressive — larger than life!
Preference: I like the shot from below because it’s dramatic and grand.
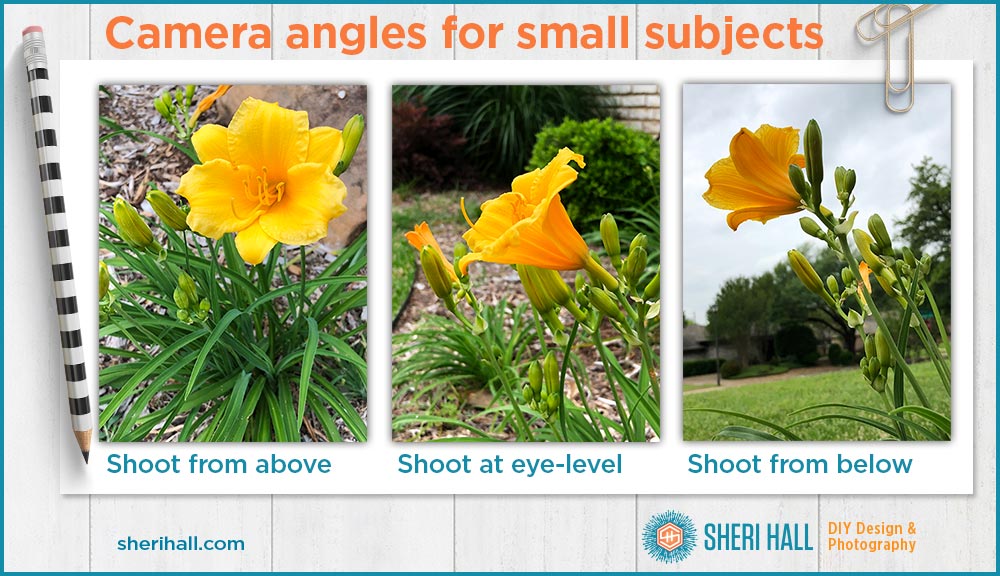
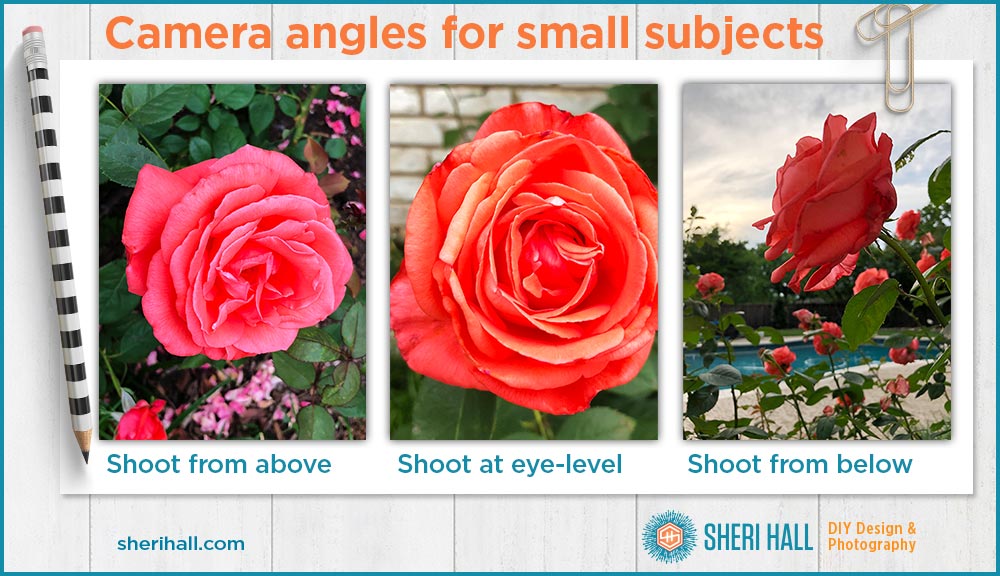
Camera angles for small subjects (1-2 feet tall):
- Hold the camera above the subject and shoot down at it. Your subject is probably too short to get any sky in the background. It should be mostly ground or floor. Your subject should look small and short. You should see all the top or most of the top of the subject.
- Hold the camera at the subject’s level for a realistic straight-on view. Your subject should look normal life-size with a realistic background.
- Hold the camera below the subject and shoot up. Since the subject is short, you may need to sit or lie on the ground to be able to get lower than it; angle the camera up. Ideally, you’ll get some sky in the background. Your subject should look dramatic, larger than normal! This will look extra dramatic if you have a good sky working for you.
Preferences: YELLOW FLOWER: I like the above shot because it tells me more about the inside of the flower. ROSE: I like the eye-level shot for documenting the rose and the below-eye-level shot that shows the sky, pool and other roses; it’s unexpected.
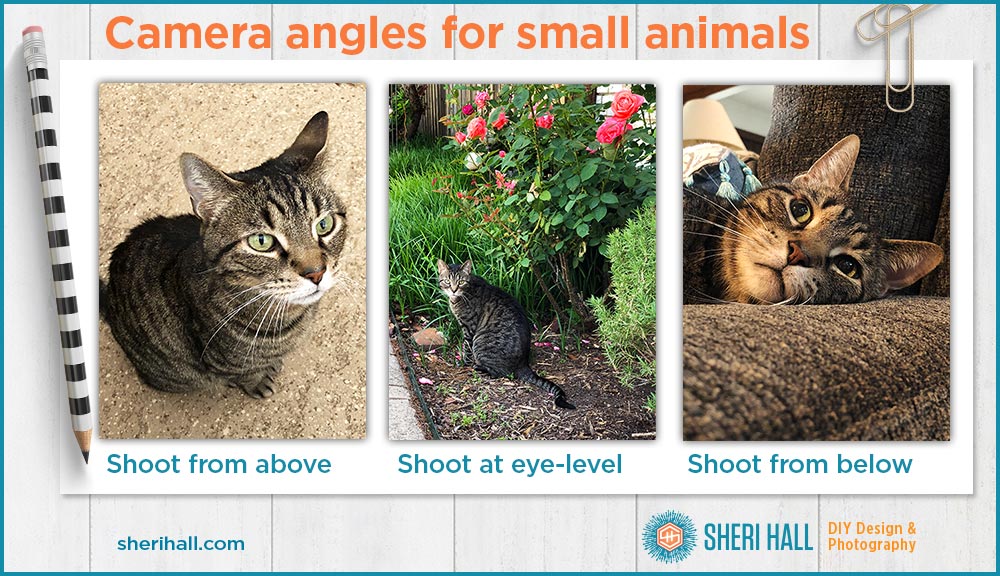
Camera angles for small animals (1-2 feet tall):
- Hold the camera above the subject’s head and shoot down at him/her. Your subject is probably too short to get any sky in the background. The background should be mostly ground or floor. Your subject should look small and short. You should see his face with the eyes in focus.
- Hold the camera at the subject’s level for a realistic straight-on view. Your subject should look normal life-size with a realistic background. For this example I’m farther back to get more of the rose garden in the shot because I wanted this photo to be about Harrison in the garden.
- Hold the camera below the subject and shoot up. Ideally, you’ll get a soft background that’s not competing with your subject. Your subject should look a little larger than life. It’s hard to shoot small animals from below because it’s hard to get down that low. You’ll need to squat or sit on the ground to get low enough. Try holding your camera down low and take a bunch of shots to see which ones work.
- Holy cats — some animals don’t like to cooperate when getting photographed!
Preference: I like the eye-level shot on this one because it shows Harrison the cat in his surroundings. (And he looks so tired of me taking his photo, haha.)
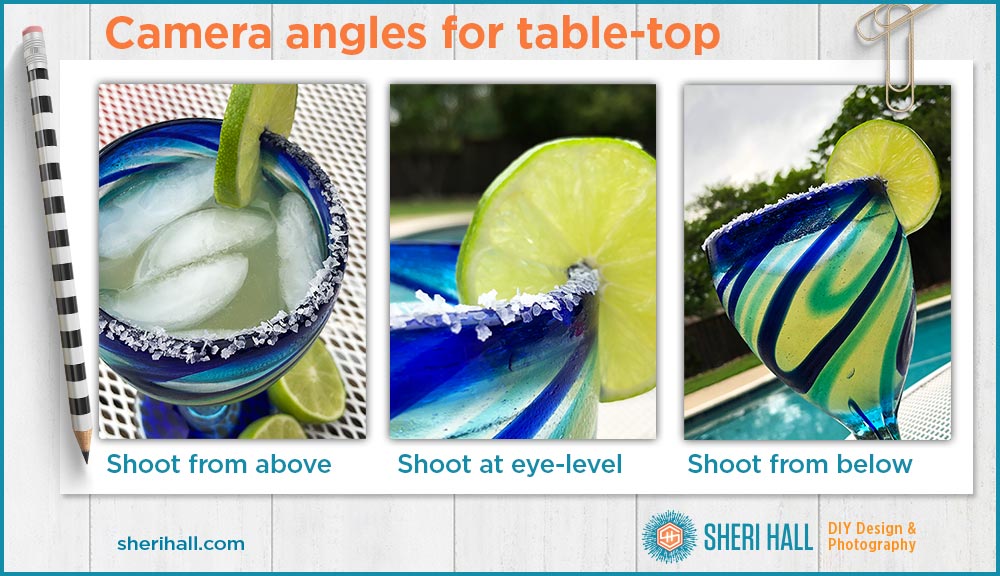
Camera angles for table-top shots of small subjects
- Hold the camera above the subject and shoot down at it. Your subject is probably too short to get any sky in the background. It should be mostly table and whatever is beyond that. Your subject should look small and short. You should see all the top or most of the top of the subject.
- Hold the camera at the subject’s level for a realistic straight-on view. Your subject should look normal life-size with a realistic but soft background.
- Hold the camera below the subject and shoot up. Ideally, you’ll get some sky in the background. For this margarita shot, I sat in the chair next to the table and set my camera on the table angling it up. Your subject should look grand and dramatic! This will look extra dramatic if you have a good sky working for you.
Preference: I like all of these shots equally. They are all valid and give me a little different story of the patio margarita: the top view limes, ice and salt on the patio table, the eye-level view of salt, glass and lime, and the dramatic up-shot with the pool and cloudy sky in the background.
(If you’d like more advice and examples on how to shoot cocktails check out my blog post 10 Tips for Shooting Captivating Cocktail Photos.)
I hope you can tell by my photo examples that there is NO ONE RIGHT ANSWER for what’s the best camera angle! The right answer is to try several for your subject and see which one YOU like best!
Try this exercise: the next time you shoot something about your size or smaller, spend a few minutes and walk around it, see how it interacts with the light, see how it looks from all angles and shoot several options. Then look through them and see what floats your boat.
If you’d like to dig a little deeper into the photography stuff and discover the best, easiest ways to edit photos on your iPhone, click the big orange button below and I’ll send you my step-by-step photo editing process using cocktails as my subject (PDF). Cheers!
Have you ever sat (or laid down) on the ground to get the perfect shot? What are your favorite tips for increasing the drama in simple every-day shots? Tell me in the comments below. Thanks!


