Sometimes you need a selfie
I recently had a large design project where I received a bunch of DIY headshots (many selfies) from 350 people and needed to process them in Photoshop to resize them, correct white balance, improve contrast, and saturation and insert them into a badge layout for volunteers at a large event. Wow, did I get a little bit of everything! The good, the odd and the what-were-they-thinking?
And then it hit me. Most people aren’t born knowing how to shoot a decent selfie (that includes me), and many people dread doing it because they don’t like photos of themselves. I resemble that remark but over the years, I’ve adapted to being on both sides of the camera. I’ve learned a few things and I’m about to share my experience with you — both from the 350 photos I processed and my own attempts to be in front of the camera, as well as behind it.
Remember, our goal here is something that resembles the subject and would work well for a general ID badge or casual brochure, but also has some character to it. It doesn’t need to be a great piece of portrait photography that hangs on the wall (because then it wouldn’t be a selfie).
Selfie appearance tips
1. Let’s start out with personal hygiene and how you’re looking today. If you have a chocolate milk mustache or melty bits from the last chocolate bar you ate stuck to the corners of your mouth, DO clean that up! Are you having a good hair day? Or at least an acceptable one?
OK, you’re all cleaned up and ready for some camera time. Ladies, if you’re wearing make-up, DO go a little heavier than you’re used to as the camera may wash it out a bit. Think eye liner, mascara, blush and lipstick. If it’s humid or you’re shooting in a swamp, DO powder your face to reduce the shine.
2. Are your clothes clean and wrinkle-free? For a head-shot selfie, it’s unlikely you’ll shoot as low as your belly button so you probably don’t need to worry about what you’re wearing on your bottom half. DO pay attention to clothing around your shoulder area.
Selfie setting tip
3. I rarely shoot a photo of myself without some interesting context; it’s usually location-based or an ussie with a friend. For these purposes though, we’re shooting for a headshot for a badge or simple brochure use, so the point is the subject, not necessarily the location.
DON’T let the surroundings overpower you, but DO try to pick somewhere a little interesting, even if it’s in front of a rustic fence in your backyard. DO look for an inside corner so the background won’t go on forever. DON’T shoot in a car, office or bathroom. Those shots should be reserved for documenting you taking off on a road-trip adventure, or documenting an outfit, not head-shot selfies that need to last a little longer.

Selfie camera tips
4. Now we’re ready for the camera/phone. Many people say to use the camera on the backside of your phone. It’s a better camera than the front-facing camera, but you can’t see what you’re shooting so that’s a trade-off. I like to see what I’m shooting because I am usually shooting me in my surroundings (in front of a scenic canyon, next to colorful graffiti etc.), and it’s easier to see what I’m actually shooting when I use the front facing camera. DO try it both ways and see what you like.
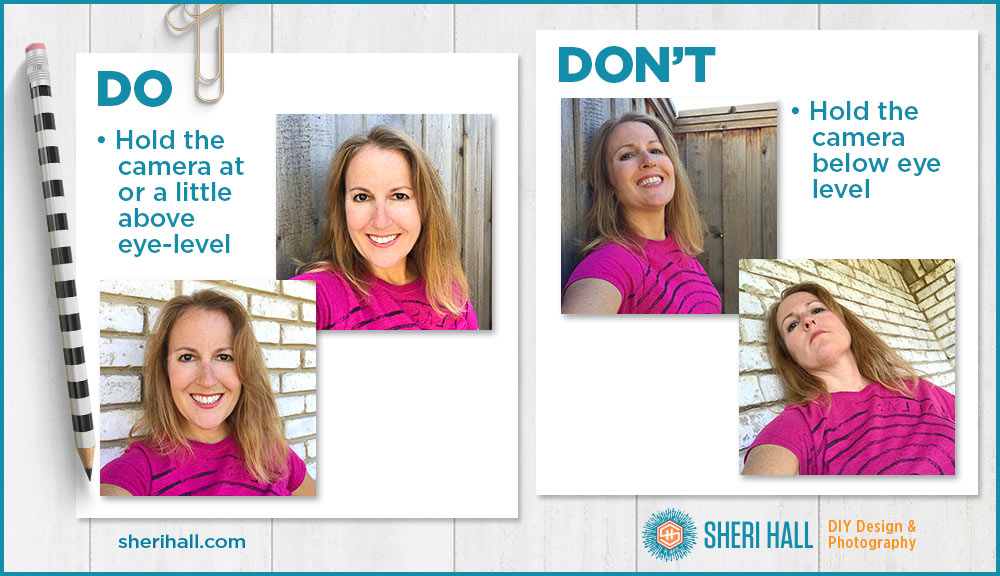
5. DO hold the camera at or a little above eye-level. DON’T hold the phone in your lap or at chin-level. DON’T be looking down at your phone. You will be shooting up at your chin, neck and nostrils; that is probably not the shot you want!

Selfie lighting tip
6. DO pay attention to the direction and strength of the light. Shoot in the day or early evening to take advantage of natural light. If you’re shooting in the daytime, DO find some light shade outside under a tree or next to a building with an interesting wall. If you’re shooting inside during the day DO find a window that’s letting in indirect sun. If you have to shoot outside in bright sun, DO put the sun fully behind your head so your head blocks it out; the sky will be blown out, but your hair will glow and your face will be lit more evenly. (You can’t do this at noon because the sun is too high in the sky.) No squinting required!

Selfie posing tips
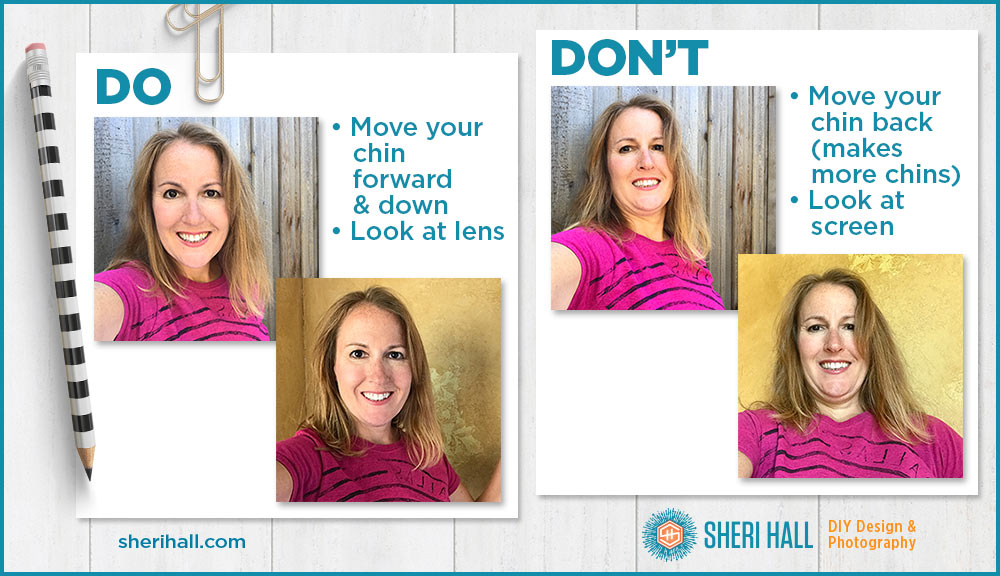
7. DO move your head slightly forward and dip your chin a little bit (like a turtle). This will get rid of any double and triple chins and prevent you from shooting your neck. DON’T move your head back or tilt up or you’ll have a photo of a double chin you don’t even have.

8. DO smile, just a little. Look at the screen to make sure you’re happy with the shot, then DO look at the lens. DON’T look at the phone screen. Click. Now smile a lot. Click. Rotate your face a little sideways and keep smiling and looking at the lens. Click. Laugh out loud. Click. You get the idea. DO practice. Take at least 10 photos in 3 locations; at least one of them should look pretty good and work for these purposes, especially with a little editing.
Selfie fun
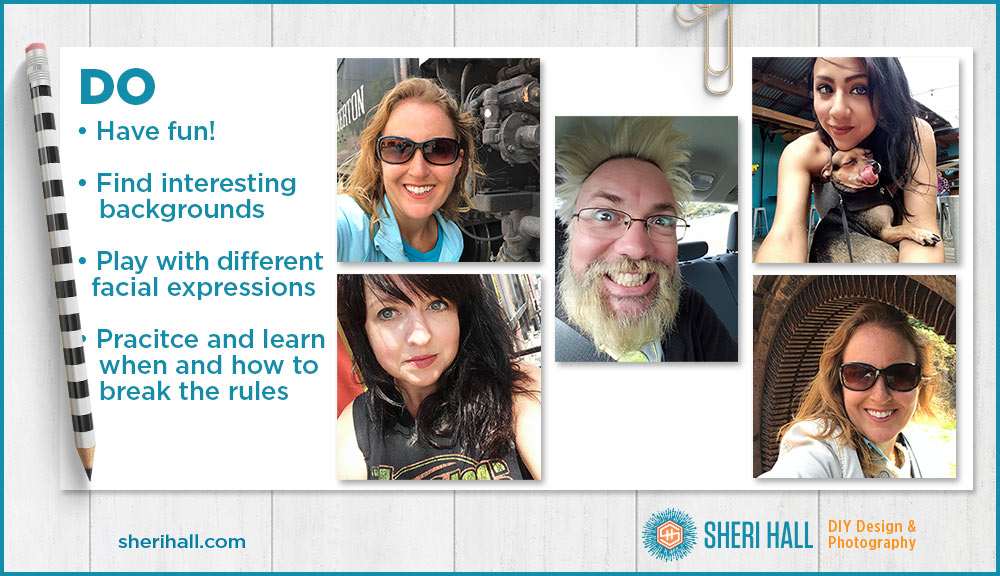
OK, now that we have the basics down, it’s time to have fun! Find some interesting backgrounds (but not too busy so that it competes with you). Look at these examples from some friends of mine (all appear here with permission – thank you!). Some of them break the rules, listed above, but they still work. Part of the fun is learning the rules and then knowing how to break them and still end up with a successful shot.

The main elements that will make or break your selfie are the lighting and how you hold your head (chin forward and down).
The next time you’re out and about and see some colorful graffiti or interesting textured back ground, whip out the old camera phone, turn on the front-side camera and see what you can do. The more you practice, the better you’ll get.
What are your thoughts on the selfie? Do you like seeing them? Do you like taking them? Do you dread it? Why? Do you think these simple tips might help you shoot with a more confidence? Do you have any selfie tips to share? Please comment below! I love hearing from readers.


thank you!!!