
Many discussions of aperture wander off into science, math and camera lens diagrams. I’m not interested in that for now. I’m interested in you experimenting with aperture settings with confidence and expanding your creative shooting! It’s fun … let’s take a look!
The basics of letting light into the camera
- How long the lens opens up (the longer the time, the more light gets in) – We call this shutter speed and it might show up on your camera as TV which stands for time value. It is measured in seconds and partial seconds; 1/50 is 1/50th of a second; 2 is 2 seconds.
- How big the lens opens up (the bigger it opens, the more light gets in) – We call this aperture and it might show up on your camera as AV which stands for aperture value. It is measured in f-stops and has odd-looking numbers like f/1.4, f/2, f/2.8. More on this later…
- How light sensitive the sensor is to the light you are letting in (the more sensitive, the more image you can see, but the more grainy it will be) – We call this ISO and it usually does not appear on your camera dial with TV and AV. It’s a separate button and can be left on “auto” unless you really want to get into manual shooting. In daylight, it’s usually a low number like 100 or 200, and in darkness, it can go up to 800, 1600 and up; the higher the number the grainier the image.
At the end, we’ll jump down the iPhone rabbit hole (one of my favorite places). There’s not much flexibility on aperture on an iPhone camera, but the computer in the iPhone can process your photos in some fun ways to approximate creative aperture use. Stay tuned for that …
Aperture settings

If you have a camera with a dial of mysterious letters and icons on it, you might be temped to leave it in AUTO or P (program) mode and let the camera make all of the decisions for you. The M is for full manual where you make all the decisions (save that for later). For now, let’s just practice making one decision (the aperture) and let the camera determine the other settings.
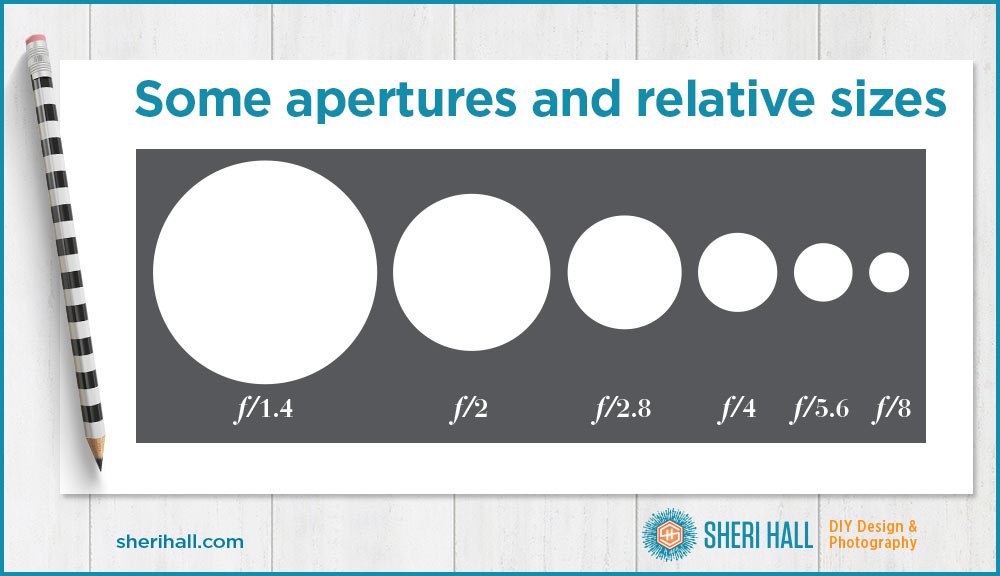
Aperture is the size of the lens opening. Each step larger in the opening lets in twice as much light. In aperture measurements, the bigger the opening, the smaller the number. So the smaller the number, the more light you are letting in. Not all lenses have the same aperture options. The more expensive lenses tend to have larger openings, i.e., their numbers go smaller.
Shooting landscapes
The aperture setting determines how much of an image is in focus from front (near the camera) to back (far away from the camera). Photographers use the term “depth of field” (DOF) to describe this.
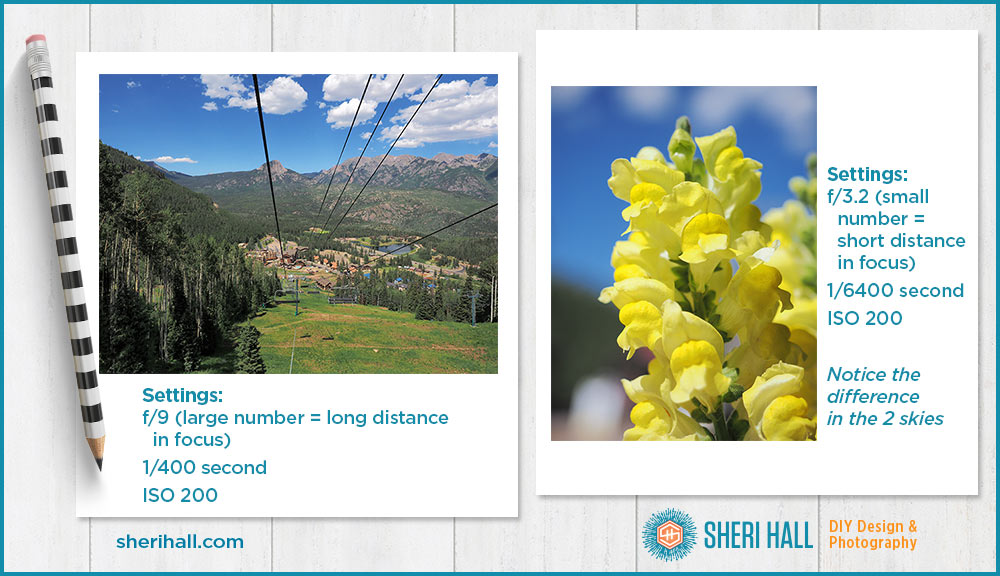
If we are shooting scenery like mountains with a trees in the foreground, a lake and some buildings here and there and sky in the distance, we probably want all that stuff in focus giving us a “deep depth of field.” The more we want in focus, the bigger the aperture number we choose. Remember it gets a little tricky because the bigger the number, the smaller the opening of the lens. But that’s not important right now. Just remember bigger number = more in focus front to back = good for grand scenery. Try setting the aperture to 11.

Shooting close-ups
As we’re hiking through the mountains, we see a pretty wildflower to shoot. What aperture should we choose? Most of the time, we would want to isolate our main subject (the flower) and blur the background, giving us a “shallow depth of field.”
I would do three things:
- Set the aperture number small
- Get close to the flower
- Zoom the lens all the way in and set the focus on the flower
I would like to tell you that I took the shot above to the left (I think those are paintbrush flowers) on purpose so I could demonstrate what happens when you take a close-up photo with a large aperture number. But no, I was just forgetful and did not reset the aperture from the previous set of photos I took of mountains in the distance. I had the aperture set at f/8 and mistakenly left it there when shooting these flowers. The sky is not as blurry as I wanted it, but the flowers are pretty.
My goof is your gain; you can tell the difference in how soft the backgrounds are. I realized my mistake after I walked off, but did not want to walk back up the mountain to reshoot. On the next shot (white, purple and yellow Columbine) I changed the aperture to f/3.2 and got a much softer background. Notice the difference in the two skies.
Remember that a smaller number = less in focus front to back. Try setting the aperture to 2. If your camera/lens doesn’t go that low, that’s OK; pick the smallest number you can and get close to the flower making sure the flower is in focus; zoom in the lens. If you want sky in the background, you’ll have to get down low to the ground and aim the camera up a bit. This makes for a dramatic shot; try it!
Flower close-up with an iPhone
On the right in the graphic above is the iPhone’s version of the Columbine. It’s easy to see it can’t come close to what a dedicated camera can do. The background is a little soft, but the lens is so small that even the f/1.8 aperture can’t isolate the flower like the Olympus can. If you ever think you don’t need a camera anymore because your phone camera does everything you want, this is a time when you will be limited by the tiny phone lens.
How much of an image is in focus is also affected by how close you are to what you’re shooting. In our mountain example, we’re far away from everything in the scene and we didn’t include anything in the foreground (like a tree branch); thus it’s easy to get the whole shot in focus. But when I was close to the paintbrush flowers, I did not get everything in focus even though my aperture number was high. That is because there was too much distance between the flowers and the trees AND I was very close to the flowers. Once you start experimenting with your aperture and how far away you are from your subject, this will make more sense.
Note: Using a shallow depth of field (less in focus, smaller aperture number, softer background) is also common in glamour photography and food photography.
How do you control aperture on a mobile phone camera?
The short answer is that you don’t, but there are some tricks and add-ons you can use to get an approximation. Talking mostly about the iPhone here — a drawback to the iPhone is that the aperture is fixed so you can’t change the setting to control the depth of field. The iPhone 7 aperture is set at f/1.8 (little number, big opening, lots of light). While this is a fairly wide aperture, it is combined with a small, wide-angle lens, so it can still provide a deep depth of field in most photos of architecture and landscape where you want everything in focus.
Shallow depth of field on iPhone
What if you want a shallow DOF from an iPhone shot? You’re probably shooting some object relatively close to you, so get close and tap the screen where you want the camera to focus (most camera apps work that way). Angle the phone so you are not right on top of the subject looking straight down, but more to the front side of it looking back though the shot. Take the photo.
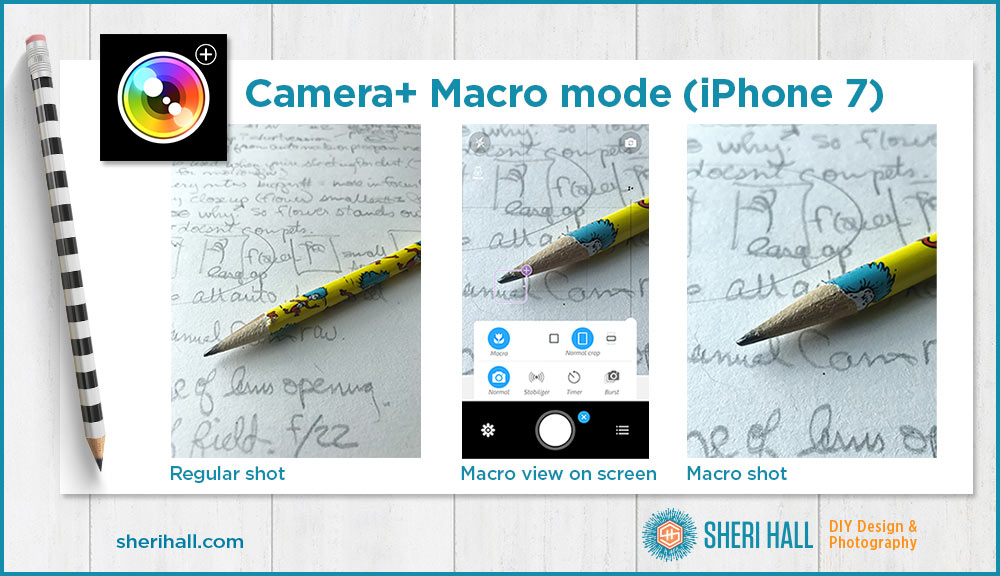
The next option is to get the Camera+ app and put it into macro mode (the little flower). You can see the camera zoom in. Set what you want it to focus on, make sure it’s in range and take the photo. Still try to keep some distance from front to back in your shot rather than overhead. Notice in the shots above how the top of the photos (the far background) is soft and you can see some texture definition in the paper and pencil.

Shallow depth of field with TiltShiftGenerator
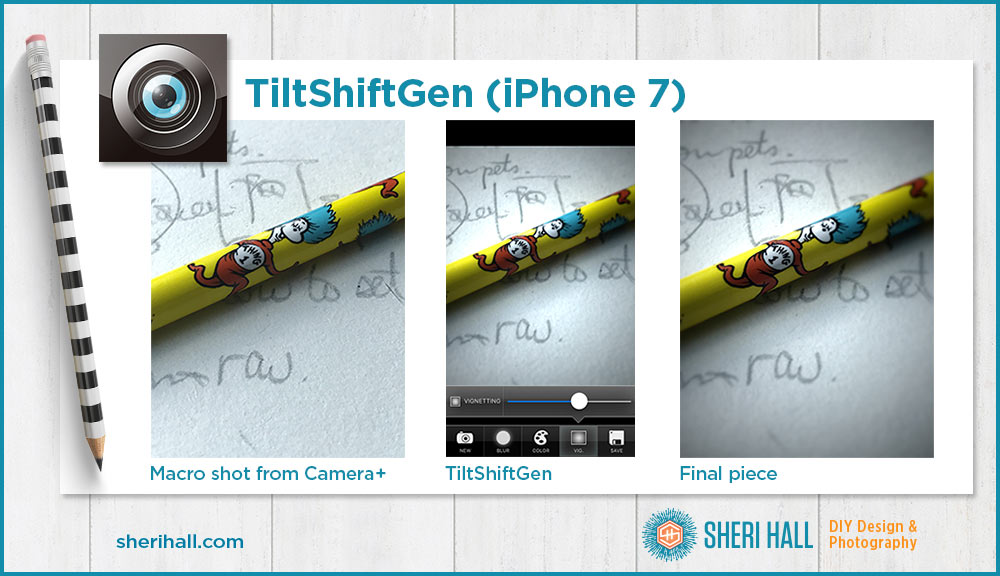
This is a fun one, especially on landscape photos! TiltShiftGenerator (in the App Store) lets you edit a shot you’ve already taken (or take a new one with the built-in camera, but I prefer to edit an existing shot); you can set the center of the focus area, then set how quickly it blurs out and set a vignette for how dark the edges of your image get.
On the pencil photo above, notice how the edges are darker than the original photo (that’s the vignette). This helps place emphasis on what you have chosen as the sharp center of your blur, the part of the photo that is in focus.
Try it on a close-up shot and a landscape shot. It makes the landscape shot look like a model set or diorama.
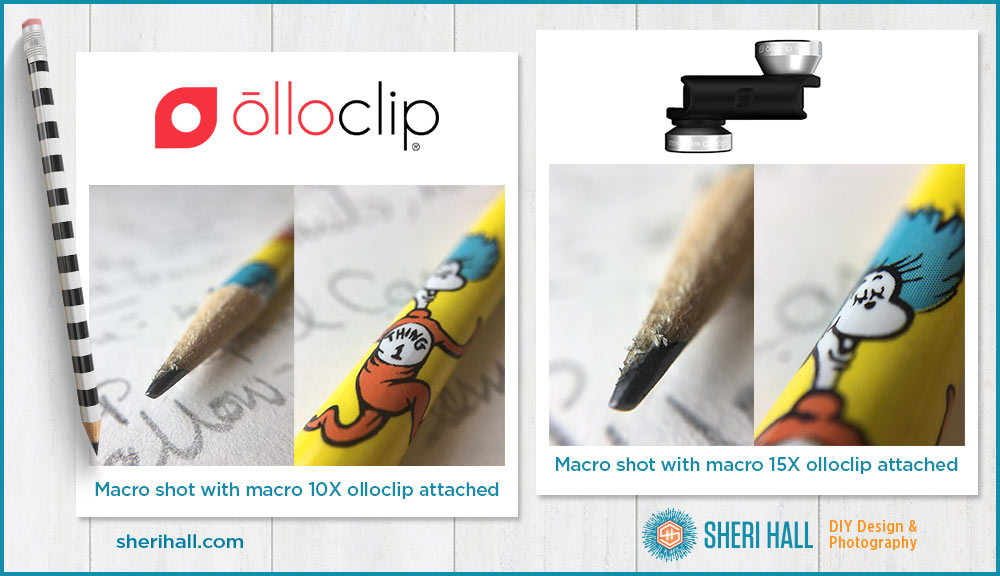
Shooting with the olloclip
If you really want to get fancy, you can buy an olloclip which includes a macro add-on lens for super close photos; expect to have the lens maybe an inch from what you’re shooting. These shots get artsy and abstract quickly. You’re basically looking at the world from a bug’s view. It’s fascinating stuff, especially textures, food and plants. Try it!
Notice how much detail is in the wood surrounding the pencil lead, how much texture is in the paper and how soft the background is.
There are various olloclip packages that also include fish-eye and wide-angle lenses. They run about $100 for the various combinations. My olloclip is one of my favorite iPhone accessories.

Do you have any questions about the olloclip or the apps mentioned in the article? What are your favorite things to take extreme close-ups of? Are you ready to go outside and play with the aperture setting on your camera?
Does anyone even own a dedicated camera anymore?? Post below; I’m curious to see how many people rely solely on their phone to take photos. One of my favorite words of wisdom is, “The best camera is the one you have with you.”
Does anyone out there own a camera anymore? Anyone, anyone?